
Zion National Park in early November was absolute magic; crisp mornings, warm afternoons, and golden foliage framing every canyon view. We went with a group of eight friends, and it was the perfect kind of trip for a group getaway: one big rental car, a cozy Airbnb, and go! A hot tub was a game-changer for soothing sore muscles after long, rugged hikes.
We spent six unforgettable days hiking iconic trails, soaking in the hot tub, and even road trips to Bryce Canyon and the North Rim of the Grand Canyon. Below is our full itinerary, complete with trail stats, elevation gain, and time estimates so you can plan your own Zion National Park adventure!

Weather Recap
Early November brought highs in the upper 70s to mid-80s °F, but by the end of the week, temperatures dipped into the 40s at night. While we had a few rainy/Snowy moments, it was mostly dry and ideal for hiking.
Day 0: Arrival & Settle In
We landed late, picked up our (massive) rental car, and grabbed groceries before checking into our Airbnb. The hot tub quickly became a nightly ritual, much needed after long hiking days.
We opted for an Airbnb in La Verkin, which is just 20 minutes from the park and at a way better price point than stays closer to Zion’s entrance.
Day 1: Emerald Pools & Canyon Overlook
Our first morning, we made breakfast, and packed our lunches for the first day of hiking. We eased into the trip with a couple of mellow but scenic trails; The Emerald Pools and the Canyon Overlook.
Emerald Pools Trail
- Trailhead: Zion Lodge shuttle stop (Stop #5 on the Zion Canyon Shuttle)
- Distance: 1.2–2.0 miles round-trip (depending on how far you go)
- Elevation gain: 70–350 ft
- Time: 1–2 hours
- Difficulty: Easy to moderate
On our first full day in Zion, we kicked things off with the Emerald Pools Trail, a perfect intro hike that gave us just the right mix of beauty and ease. This trail is super accessible and one of Zion’s most popular for a reason: it winds through a gorgeous canyon landscape with waterfalls, lush vegetation, and three distinct “pools” that feel like little desert oases.
We started from the Zion Lodge shuttle stop and headed straight to the Lower Emerald Pool. The trail here is paved and mostly flat, so it’s a great option if you’re easing into the altitude or just want something light. Water trickled down from the cliffs above, and we walked underneath gentle waterfalls that misted the path; magical with the golden leaves everywhere.
From there, we decided to keep going to the Middle Pool, which was a bit more of a climb but still manageable. This section opened up to wider canyon views, and we could see the water making its way down to the falls below.
The final stretch up to the Upper Emerald Pool was definitely the most challenging. It’s steeper, a little rocky, and unpaved, but totally worth it. The Upper Pool is tucked beneath a massive rock wall and surrounded by cottonwoods. It felt peaceful and quiet, almost like a hidden sanctuary in the middle of the desert.

Canyon Overlook Trail
- Trailhead: East side of the Zion-Mount Carmel Tunnel (small parking lot just past the tunnel if coming from the main canyon)
- Distance: 1 mile out-and-back
- Elevation gain: Minimal (<100 ft)
- Time: 1 hour
- Difficulty: Easy
Later that same day, we headed to the Canyon Overlook Trail, a short hike with one of the biggest views in all of Zion. If you only have time for one viewpoint, make it this one. It’s a quick adventure with a serious wow factor, especially at sunset.
The trail starts just past the Zion-Mount Carmel Tunnel, and parking can be tricky since the lot is small. We lucked out and snagged a spot before it got too crowded. The hike is only about 1 mile round-trip, but don’t let the short distance fool you; a lot of beauty is packed in.
The path follows the edge of a cliff (there are railings in the exposed sections), crossing slickrock ledges, a wooden bridge, and a few tight corners with stunning drop-offs. It’s not difficult, but it does require some attention, especially if you’re hiking with kids or anyone uneasy with heights.
The payoff is a sweeping view of Pine Creek Canyon and the lower Zion Canyon below. As the sun dropped, the cliffs lit up in every shade of gold and orange, and the whole valley felt like it was glowing. It was one of those moments where you just want to sit quietly and soak it all in.

Both hikes were the perfect way to acclimate. Emerald Pools had peaceful autumn views and easy terrain, while Canyon Overlook gave us a breathtaking sunset panorama.
Dinner was simple: spaghetti back at the Airbnb, followed by (you guessed it) a hot tub soak.
Day 2: Bryce Canyon Day Trip — The Full Figure‑8 Loop
Just a short drive from Zion, River Rock Roasting Co. sits perched on the edge of a basalt canyon overlooking the Virgin River, making it the perfect pit stop before or after a day of hiking. Inside this bright and casual café, you’ll find:
- Freshly roasted coffee and espresso made in-house on their vintage Diedrich roaster, sourced sustainably from fair‑trade farms.
- Homemade pastries, sandwiches, pizzas, salads, and beer, all crafted from scratch.
- Local art and apparel on display and for sale, including quirky t‑shirts and prints from artists in the Zion region. (We purchased an adorable piece of art here as a souvenir.)

Trail: Figure 8 Loop (Queen’s Garden → Peekaboo Loop → Navajo Loop w/ Wall Street exit)
- Trailhead: Start at Sunrise Point (Queen’s Garden Trailhead)
- Distance: 6.4 miles
- Elevation gain: 1,575 ft
- Time: 4–5 hours
- Difficulty: Moderate to strenuous
On Day 2, we took a break from Zion and road-tripped to Bryce Canyon National Park, and wow, did it deliver. We tackled the Figure 8 Loop, a combination of three iconic trails that wind through Bryce’s dreamlike landscape of hoodoos, narrow slot canyons, and towering rock formations.
We started the loop with Queen’s Garden, which was the gentlest descent of the day. The trail felt almost whimsical, lined with fairy‑tale hoodoos, little tunnels carved through rock, and golden light filtering through the canyon. It was the calm before the burn.
From there, we entered Peekaboo Loop, which upped the intensity fast. This section is steep, with multiple climbs and descents, but the views were absolutely unreal. Highlights included the Wall of Windows and Cathedral, two massive formations that stopped us in our tracks. We took plenty of breaks, not just to catch our breath, but to take it all in.
We ended the loop with the famous Navajo Loop, exiting via the Wall Street route. This part was no joke, tight switchbacks through a towering, narrow canyon that felt dramatic and a little dizzying. By the time we reached the rim, our legs were toast, but the sense of accomplishment (and the photos) made it totally worth it.
In hindsight, we might’ve flipped the route and started with Wall Street for a more gradual climb out. But either way, it was a challenging, iconic hike that we’ll be talking about for years.


Dinner was hibachi and sake at Ninja Japanese Steakhouse, followed by another recovery session in the hot tub.
Day 3: Attempted The Narrows
Trail: The Narrows
- Route: Bottom-up hike via Riverside Walk
- Distance: 2 miles to reach the canyon entrance; can go up to 9.4 miles round-trip if conditions allow
- Elevation Gain: Minimal, but walking against the current is physically demanding
- Time: 1–8 hours depending on how far you go
- Difficulty: Easy to strenuous (depends on depth, flow rate, and gear)
- Trailhead: Temple of Sinawava (Shuttle Stop #9)
On Day 3, we set out to hike The Narrows, one of Zion’s most iconic and otherworldly trails. Unlike anything else in the park, this hike isn’t just beside the Virgin River (it’s in it). You’re literally walking upstream through a narrow canyon with towering rock walls rising hundreds of feet on either side. It feels like stepping into another world.
We started with the Riverside Walk, a scenic, paved path that follows the river for about a mile. This section alone is beautiful and worth doing even if you don’t plan to go further. Once the pavement ended, we stepped into the river, and that’s when the real adventure began.
We attempted a bottom-up hike into the Narrows without renting gear, and while it started off fine, the conditions quickly got more intense. The water was cold, waist-deep in spots, and there was a flash flood advisory in effect. Without neoprene socks or proper footwear, it became clear we wouldn’t make it too far safely. We turned back before reaching the narrowest section, but even just that short stretch gave us a taste of the magic.


Lunch at Stage Coach Grille (and a lifesaving Irish coffee) warmed us up. That night we kept it low-key with pizza delivery and, of course, a hot tub soak.
Day 4: North Rim Grand Canyon Road Trip
On Day 4, we loaded up all eight of us into the car and hit the road for a day trip to the North Rim of the Grand Canyon. It’s not the most common detour from Zion, but we couldn’t resist the opportunity to see another national park while we were so close, or so we thought.
From our base in La Verkin, UT, the drive to the North Rim took about 3 hours each way (around 125 miles one-way). The route winds through remote stretches of southern Utah and northern Arizona, passing through scenic high-desert landscapes and some truly empty backroads. There aren’t many gas stations or rest stops, so definitely fuel up and grab snacks before you go.
We knew it would be chilly up there, but nothing prepared us for how cold it actually was. By the time we arrived, the temperature had dropped dramatically, and the North Rim was blanketed in snow; beautiful, yes, but absolutely freezing. Roads were icy, some trails were closed, and we had to bundle up just to take in the views from the main overlooks like Bright Angel Point.
The North Rim is much quieter and more remote than the South Rim, and it definitely offers a different vibe; more rugged, peaceful, and untouched. But in early November, that solitude comes with a cost: biting winds, icy paths, and very few amenities open. We snapped a few photos, did a short walk, and then quickly returned to the car.

We powered through on gas station snacks (beef jerky and trail mix), then warmed up back at the Airbnb with leftover pizza and the hot tub.
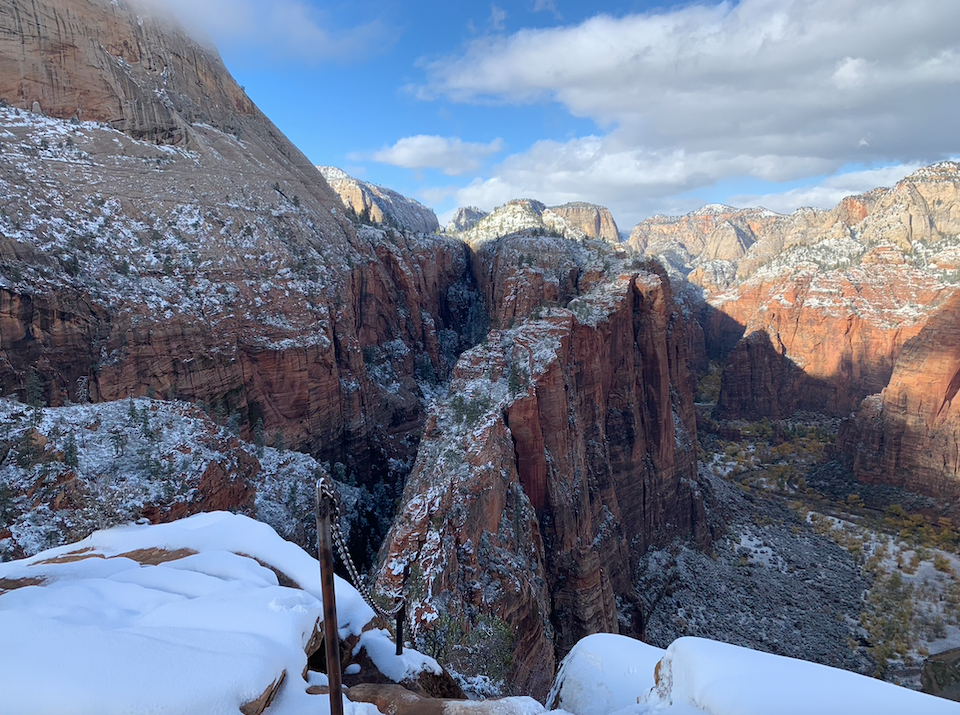
Day 5: Angels Landing Finale
Trail: Angels Landing
- Distance: 5.5 miles round-trip
- Elevation gain: 1,500 ft
- Time: 4–5 hours
- Rated: Class 3 difficulty (chains, exposure, sheer drop-offs)
- Important Note: You need a permit to hike this trail!
We saved the most iconic, and easily the most adrenaline-pumping, for last. Angels Landing is the kind of hike that leaves a mark on you, both physically and emotionally. It starts off tame enough: the well-maintained West Rim Trail climbs steadily through Refrigerator Canyon before you hit the tight, steep switchbacks known as Walter’s Wiggles. But the final half-mile defines this trail, and gives it its legendary status.
To reach the summit, hikers traverse a narrow sandstone ridge with 1,000-foot drop-offs on either side. The only protection? A series of bolted chains to cling to as you scramble, balance, and sometimes hug the cliff wall, or another hiker, to pass. When we hiked it, a sudden snow flurry swept in mid-climb. The rocks turned slick underfoot, visibility dropped, and we found ourselves literally sliding down icy patches, gripping the chains with white-knuckled hands. It was thrilling and terrifying, a real test of nerve and focus.
And make no mistake: this trail is dangerous. Many people have actually died from falls on Angels Landing. The trail is not for the faint of heart or those with a fear of heights, and it demands good footwear, balance, caution, and respect. Because of the risk and its rising popularity, the park now requires hikers to enter a permit lottery to access the chain section, designed to reduce congestion and improve safety.
That said, for those who are up for the challenge and come prepared, the views from the top are nothing short of breathtaking. Zion Canyon stretches below like a living painting, and the sense of scale is overwhelming. It’s a trail that leaves you in awe, not just of the landscape, but of what you overcame to get there.
Angels Landing isn’t just a hike, it’s a heart-pounding, bucket-list experience. And for us, it was the ultimate way to end our Zion adventure.


We closed out the trip with dinner at Zion Pizza & Noodle Co. and one last soak under the stars.
Tips for Visiting Zion
- Best Time to Go: Spring and fall offer the most comfortable weather for hiking. Summer temps can exceed 100°F, and the rocks radiate heat, start hikes early and bring plenty of water.
- Use the Shuttle: During peak season, the Zion Canyon shuttle is the only way to access the most popular trailheads.
- Expect Crowds: Spring and fall are the busiest seasons; arrive early (7:30 am) to beat the rush.
- Watch the Weather: Flash floods are a serious risk, especially in late summer. Check conditions before hiking The Narrows (and secure your rentals in advance).
- Plan for Permits: Angels Landing requires a permit via lottery. The Narrows often needs special gear like neoprene socks and waterproof layers.
- Entrance Fee: $35 per vehicle, valid for 7 days.
- Limited Cell Service: Reception is spotty inside the park; Springdale is your best bet for signal.
- Pet Policy: Pets are only allowed in campgrounds and parking lots, not on shuttles or trails.
💰 Budgeting for Zion (Per Person)
Entrance & Permit Fees
- Zion Vehicle Pass ($35 split with group): $7–$12 per person (assuming 2–5 people splitting)
- Angels Landing Permit: $6 to enter the lottery + $3 if selected = $9 total (only if hiking Angels Landing)
Typical 6-Day Zion Budget (Per Person)
| Expense Category | Approx. Total Per Person |
|---|---|
| Park Entry (split w/ your group – $35 one-time for 7 days) | $7–$12 (assuming 2-5 people splitting) |
| Lodging (shared Airbnb/hotel room) | $360 (6 nights – Assuming $60/night) |
| Food (mix of dining out and groceries) | $384 (6 days – Assuming $64/day) |
| Transportation (gas, shared car rental, shuttle tips) | $90–$120 (6 days – Assuming $15-$20/day) |
| Activities & Tips | $150 |
| Angels Landing Permit | $9 (optional) |
| Total Estimate | $990–$1,050 Per Person |
Money-Saving Tips
- Split lodging, car rentals, and entrance fees with your group
- Pack snacks and cook a few meals to save on food
- Visit during shoulder season (early spring or late fall) for lower accommodation rates
- Use Free Entry Days (about 7 dates per year) if your schedule allows
- Bring your own hiking gear to avoid rental costs for The Narrows (like neoprene socks or trekking poles)
Final Thoughts
This trip was everything we love about national park travel: vibrant hikes, jaw-dropping views, and the little luxury of a hot tub at the end of the day. Zion caters to both casual explorers and seasoned adventurers, and we can’t recommend it enough.
📍 Interactive Map: Scroll down to see a map of every trail and destination from our six-day adventure.